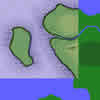
Creating a World Mapby Zammy Note: This article first appeared in Russian on Arcanum City, It was written/translated by Zammy and edited by Calis. I. TermsFirst I'd like to define a number of terms, just so we're clear on what we're talking about...1) GUI Map - Represents the world map image, or a set of them. The standard format for Arcanum - BMP 256 colours. If you want to divide it into multiple segments, use segments of an equal size. 2) Chunk - Segment of the GUI Map, put in a separate file. Files can be named arbitrarily, but they should contain an identical textual prefix and a three-digit numerical part after that (in this manual I shall use map001.bmp, map002.bmp, map003.bmp etc.). 3) Terrain - This is a surface of your map. Editing it can only be done in WorldEd. Terrain can be seen in the lower left corner of the editor. You can get a BMP of Terrain by choosing "Export terrain bitmap" in WorldEd. The BMP will appear in the directory Maps of your mod and will be named the same as map from which it is obtained. II. Link between GUI Map and Terrain1) Each pixel on the GUI Map corresponds to one sector of Terrain. If you use a map with a pixel size of 500x500, it will correspond to 500 x 500 terrain sectors. 2) The link between the terrain map in WorldEd and the GUI worldmap is as follows: the terrain map defines where your character can (and can't) walk. You need to make sure this is reflected on the worldmap. 3) If the GUI Map is larger than the Terrain, you won't be able to travel beyond
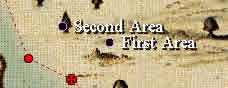
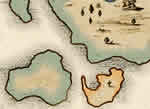
the terrain boundaries, but will see the entire GUI Map. Reference to the images
below for examples of this. (the red square indicates the area a character can
travel in)
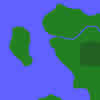
4) If the GUI Map is smaller than the Terrain, the following happens:
III. Let's clear upThis section contains a number of handy guidelines for making your own worldmap.1) Is using a world map useful in your mod? 2) Map size
3) Division into segments If you use a map of Minimum size, the division into segments is not required, as you can easily make one big segment of 501x365. If your map is rather large and you want to divide it into segments, make segments of an identical size. I tried to divide a minimum map (501 x 365) into 4 segments by a size 251x183, and it worked perfectly. 4) Image format - all bitmaps in Arcanum are 256 color windows BMPs, and this is what the GUI map should be, as well. IV. Getting startedSo, you have decided to make world map and have defined its size. Listen to my advice: you'll really want to make the terrain map first. Export the WorldED terrain map and edit it to make it look however you want. It's, of course, entirely possible to do it the other way around, but it'll take you a *lot* of time to make sure your GUI map matches your terrain map if you go with that method. Take a look on example of creation of World map 501 x 365, without splittings into segments, but on a course of an explanation I shall specify, how to make most for a map broken on segments. If your Terrain is already done, skip the first step.
3. Create a directory "WorldMap" in your mod directory. Create a file named "Worldmap.mes" in this directory. Put the following two lines into the file:
Let's take a look at what these lines mean. {20}{0, 0} - These specify the coordinate origin of your world map. In the game, placing the cursor above a map shows coordinates relative to this point. If the origin is placed in sector with coordinates (0, 0), moving the cursor in the game from upper right corner of a map to the lower left, we see both X and Y coordinates increase from zero. If we enter, for example, 100 and 100, we transfer the origin to sector (100, 100) and logical coordinates of the upper right corner (i.e. the coordinates we see by placing the cursor in the right upper corner of a map) will become -100, -100. "{50}{1, 1," - 1 and 1 it is a size of a map in segments on X and Y
(in this case only 1 segment) The second line is linked to the world map, as described above. Please note that "WorldMap: 0" is necessarily for the map that is linked to the worldmap! There might be a possibility here to use multiple worldmaps, but I have no idea how to do this. 4. To create "hot spots" on your world map (you know, like the cities in the main game), you need to edit a file and add all your towns and such. Find the file "gamearea.mes" in the directory MES of your mod. Let's take a look at the following line:
I don't recommend you touch this line, just create new lines below it! Let's
consider the parameters The next two numbers represent the offset of the coordinates of this area on the world map. For instance:
After the first back slash "/" you will need to enter the area name, which
you will see on the WorldMap. After the second backslash you can enter the description
that will be shown if you hover the mouse over the location. Furthermore, if
your Story requires it, it is possible to add the parameter " /Radius: " followed
by a number, how close an area should be passed by in order for it to become
visible (by default "5"). If you use "-1" , this area will not be designated
on a map, even if you pass directly over it, but it can be made visible by other
means (dialogue or other scripting).
5. Now, how can you connect a map of the world with other maps? For teleportation
purposes and other things, it's necessary to link small maps, such as dungeons, to an area on the map where you'd like it to show up. When describing your small map in maplist.mes, add keyword "Area" followed by the number of the "parent" area.
Your area will NOT be accessible directly from world map travel. Here is how it is done in Arcanum: GameArea.mes :
MapList.mes :
Again, you can see WorldMap : 0 and the number of area, on which the map number is specified: 21 in this case (Tarant). V. PSI have found out one thing about using more than one world map. By registering in worldmap.mes 2 lines with numbers 21 and 51, registering one more map, and by adding one more map in MapList.mes and by specifying it "WorldMap:1", on this map it is possible to see the second WorldMap! Walking on it is as of yet impossible, though. It is impossible also to register areas because gamearea.mes only allows areas for one worldmap. Most likely it is impossible to make another working WorldMap. |


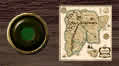
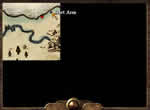 The window Arcanum uses
to display world maps is 501 by 365 pixels. If you're going to use a map smaller
than that, you'll get an effect similar to what you can see in the picture on
the right. I recommend that you make your world map at least 501 by 365 pixels
to avoid a "black" area.
The window Arcanum uses
to display world maps is 501 by 365 pixels. If you're going to use a map smaller
than that, you'll get an effect similar to what you can see in the picture on
the right. I recommend that you make your world map at least 501 by 365 pixels
to avoid a "black" area.
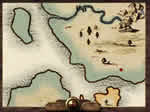 However, even with a 501 x 365 size world
map you'll run into some troubles. The map will start scrolling once
you move towards the lower right of the world map! It seems the icon representing
your party will always be in the center of the world map window.
However, even with a 501 x 365 size world
map you'll run into some troubles. The map will start scrolling once
you move towards the lower right of the world map! It seems the icon representing
your party will always be in the center of the world map window.  If your mod is as large as Arcanum itself (2000 x 2000), this won't be a problem.
It seems the map size is somehow hardcoded into Arcanum, and I have yet to figure
out how to change it. To avoid black bars on the right and from below, you can
make your GUI Map larger than your Terrain: make it 251 pixels larger on X and 183 on Y (501 and 365 divided
by 2). Fill this space by water or or other images that indicate the area can't be traveled through, similar to the seas
of Arcanum. I recommend you use a 501x365 sized terrain map, as it is easily large enough for most mods.
If your mod is as large as Arcanum itself (2000 x 2000), this won't be a problem.
It seems the map size is somehow hardcoded into Arcanum, and I have yet to figure
out how to change it. To avoid black bars on the right and from below, you can
make your GUI Map larger than your Terrain: make it 251 pixels larger on X and 183 on Y (501 and 365 divided
by 2). Fill this space by water or or other images that indicate the area can't be traveled through, similar to the seas
of Arcanum. I recommend you use a 501x365 sized terrain map, as it is easily large enough for most mods.
 ZoomedName: ZoomMap - sets the name of
an unzoomed version of the GUI Map. Resize your GUI Map to 365x365 and save
in this directory as "ZoomMap.bmp". Now you'll see a small variant of your map
on the map screen. You can also edit the ZoomMap file yourself, of course.
ZoomedName: ZoomMap - sets the name of
an unzoomed version of the GUI Map. Resize your GUI Map to 365x365 and save
in this directory as "ZoomMap.bmp". Now you'll see a small variant of your map
on the map screen. You can also edit the ZoomMap file yourself, of course.


Page not found for path ads/bottom.html |
 |